

How Many Roof Tiles Do You Need? Slope, Coverage and Waste Explained
- By: Cailin
- Oct 20 2026
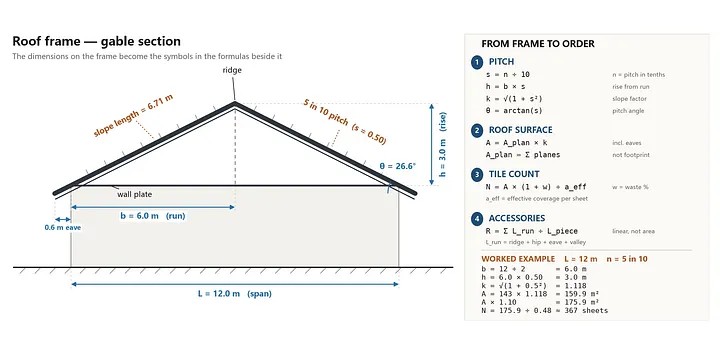
Almost every roofing quantity argument starts in the same place: someone measured the building instead of the roof. A floor plan gives you the footprint of a house. It does not give you the surface you are about to cover, because a pitched roof is a larger area tilted up over that footprint — and it grows again once the eaves overhang the walls.
This guide walks through the three numbers that decide whether a tile order is right or wrong, shows a full worked example, and then answers the second question that always follows: how steep should the roof be in the first place?
The three numbers behind every tile order
Everything reduces to this:
Roof surface area = roof plan area (including eaves) × slope factor
Slope factor = √(1 + slope²), where slope = rise ÷ run
Panels needed = roof surface area × (1 + waste) ÷ effective coverage per panel
Get the plan area, the slope factor and the effective coverage right, and the arithmetic takes care of itself. Get any one of them wrong and the error is compounded by the other two.
Step 1 — Measure the roof, not the walls
Start from the roof plan. Two corrections matter more than any other detail at this stage.
Include the overhang. The roof runs past the wall line on every side, and that overhang is covered with the same material. Measuring to the wall face is the single most common way buyers under-order — on a villa with 500 mm eaves, it can be worth 8–10% of the total.
Measure each plane separately. On a simple gable you can get away with one rectangle. On hip roofs, L-shaped plans, dormers and anything with a valley, each plane has its own area and its own waste profile. Sum the planes; do not apply a single multiplier to the footprint and hope.
Then convert the flat plan into a pitched surface. The multiplier depends only on the slope:
| Slope (tenths pitch) | Percentage | Rise : 12 | Degrees | Slope factor |
|---|---|---|---|---|
| 2 | 20% | 2.4 : 12 | 11.3° | 1.020 |
| 3 | 30% | 3.6 : 12 | 16.7° | 1.044 |
| 4 | 40% | 4.8 : 12 | 21.8° | 1.077 |
| 5 | 50% | 6 : 12 | 26.6° | 1.118 |
| 6 | 60% | 7.2 : 12 | 31.0° | 1.166 |
| 7 | 70% | 8.4 : 12 | 35.0° | 1.221 |
| 8 | 80% | 9.6 : 12 | 38.7° | 1.281 |
At 5 tenths pitch the factor is 1.118: a 143 m² plan actually needs about 160 m² of material. Skip this step and the order is already 12% short before the first cut. At 8 tenths pitch the same plan needs 28% more.
Step 2 — Turn area into panels with effective coverage
This is where most spreadsheets fail. The size printed on a price list is the panel’s outline, not the area it covers.
Every interlocking roof panel loses material at two places: the side lap, where it locks into the panel next to it, and the head lap, where it tucks under the panel above. A panel that measures 1,340 × 420 mm does not cover 0.56 m². It covers less, and the number that goes into your calculation is the smaller one.
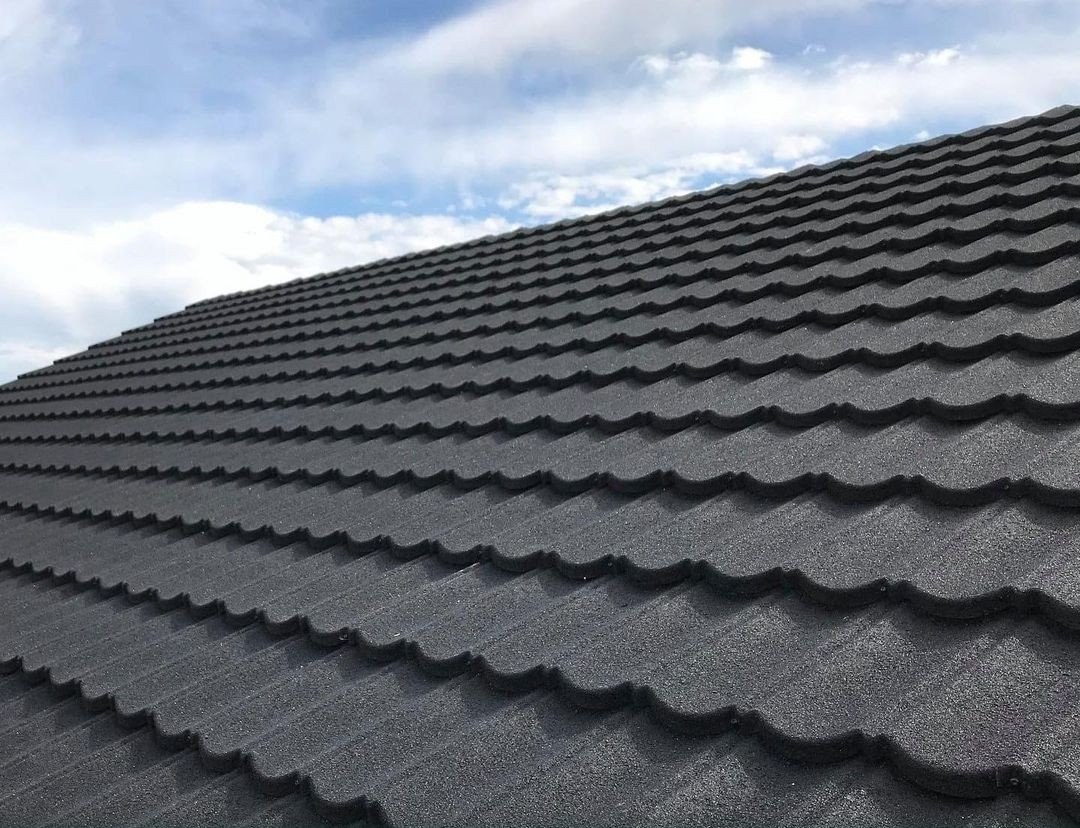
Ask the supplier for effective coverage per panel, or for panels per square metre. For the Cailin profiles used in the example below, one panel covers 0.48 m², which is 2.08 panels per square metre of finished roof. A supplier who cannot give you this figure in writing is asking you to guess.
Step 3 — Waste, accessories and the spares you will want later
Waste is not a cushion added for comfort. It is the material consumed by cutting at hips, valleys, ridges and verges, plus handling breakage and the ends of cartons.
| Roof form | Waste allowance |
|---|---|
| Simple rectangular gable, few penetrations | 5–8% |
| Gable with dormers or one or two valleys | 8–12% |
| Hip roof, several valleys, complex plan | 12–15% |
Then there is the category that quietly breaks the budget: accessories. Ridge caps, hip caps, verge and eave trim, valley trays, starter strips and fasteners are sold by the linear metre or by the piece. They never appear in an area calculation. Measure each ridge, hip, eave and valley run from the plan, then divide by the effective length of the accessory.
Finally, order a handful of spare panels. Stone granules are applied in production batches, and a repair two or three years later with a panel from a different batch can show a colour difference in daylight. A few extra panels are cheap insurance.
A complete worked example
Take a 12 m × 10 m villa footprint, a gable roof, 0.5 m eaves all round, a 5 tenths pitch slope and a 10% waste allowance.
| Step | Calculation | Result |
|---|---|---|
| Roof plan area incl. eaves | 13 × 11 | 143.0 m² |
| Slope factor at 5 tenths pitch | 143.0 × 1.118 | 159.9 m² |
| Add 10% waste | 159.9 × 1.10 | 175.9 m² |
| Effective coverage per panel | from the data sheet | 0.48 m² |
| Panels required | 175.9 ÷ 0.48 | ≈ 367 panels |
Two cautions. The 0.48 m² is the figure for the profiles shown here — substitute your own supplier’s number, because it changes with panel design. And 367 is a material quantity, not an order quantity: you still have to round up to full cartons or pallets, and add the accessories.
How steep should the roof be?
Two limits apply at the same time: what the material can tolerate, and what the weather demands.
The material floor. Lapped metal panels without applied sealant are generally not approved below 3:12 (about 2.5 tenths pitch). Most stone-coated data sheets print that same minimum. Designing at 3 tenths pitch rather than 2.5 leaves a small margin; at the absolute floor there is no reserve, and wind-driven rain can creep back under the laps.
The climate band. Above the floor, the choice is about drainage, cost and wind.
| Situation | Recommended slope |
|---|---|
| Heavy monsoon or tropical rainfall | 5–6 tenths pitch (26.6–31.0°) |
| Temperate, moderate rainfall | 4–5 tenths pitch (21.8–26.6°) |
| Snow-load region | 6 tenths pitch or steeper, with snow guards |
| Large area, cost-sensitive project | 3–4 tenths pitch, never below the product minimum |
Every extra tenths pitch adds surface area you have to buy. Moving from 4 to 6 tenths pitch increases the roof surface by roughly 8% for the same footprint — on a 300 m² villa that is a real line item, not a rounding error.
Steeper planes also catch more wind, and uplift concentrates at ridges, verges and corners. Concealed-fix interlocking systems handle this better than exposed-screw panels, because there is no fastener head for the wind to work on and no washer to perish.
A practical default. If there is no extreme snow load and the brief is a villa that will not leak and will not overspend, 4–5 tenths pitch is the band where drainage, walkability, appearance and material cost stop fighting each other. It sits safely above the minimum, and it keeps the slope factor under 1.12.
How to measure the slope of a roof that already exists
- Lay a spirit level horizontally on the roof plane, pointing along the slope.
- Measure the vertical gap between the downhill end of the level and the roof surface — that is the rise.
- The length of the level is your run.
- Divide rise by run for the slope; multiply by 10 for tenths pitch, or by 12 for the x:12 convention.
A 600 mm level with 150 mm of rise gives 0.25 — that is 2.5 tenths pitch, or 3:12, right at the minimum most metal systems will accept. The same level with 300 mm of rise gives 0.5 — 5 tenths pitch, 6:12, comfortably mid-band.
Frequently asked questions
How many roof tiles do I need per square metre?
Divide 1 m² by the effective coverage of one panel. At 0.48 m² per panel that is 2.08 panels per finished square metre. Use effective coverage, not the panel’s outline size.
Is 3 tenths pitch enough for a metal roof?
It sits just above the 3:12 minimum for lapped panels and it works — but with no margin for installation error, so the underlayment and lap detailing have to be right.
Can I go lower than 3 tenths pitch?
Some lapped systems are approved to 2.5 tenths pitch. Below that you need a different system — standing seam, or panels with applied lap sealant and written approval from the manufacturer.
How much waste should I add?
5–8% for a simple gable, 8–12% with valleys or dormers, 12–15% for a hip roof with a complex plan. Accessories are additional and are not covered by any area figure.
Do I subtract chimneys and skylights?
Deduct openings larger than a full panel. Leave small penetrations in the area and let the waste allowance absorb them, because you lose material around them anyway.
Can new panels go over an old roof?
Often yes with lightweight interlocking panels, but the existing deck, battens and structural capacity decide it. Check dead load before aesthetics.
The eight-point checklist
- Roof plan area including eaves — never the floor area.
- Each plane measured separately on hips, valleys and dormers.
- Slope factor applied: √(1 + slope²).
- Effective coverage per panel taken from the data sheet.
- Waste allowance matched to roof complexity.
- Ridge, hip, verge, valley and starter counted in linear metres.
- Slope checked against both the code minimum and the profile’s data sheet.
- A few spare panels from the same production batch.
Get those eight right and the quantity argument disappears before the first delivery arrives.
Need the numbers checked against a real profile?
Send us your roof plan, the site conditions and the intended slope, and we will work the quantity against the actual product rather than a rule of thumb. Our stone-coated ranges — Shake, Bond and Shingle — share the same 1,340 × 420 mm panel geometry but differ in profile and effective coverage, so the coverage figure should always come from the specific data sheet.
Contact the Cailin team with your drawings and we will come back with a panel count, an accessory schedule and a slope recommendation for your climate.